-A Add Room
|
1.Press Alt + A or click on “-A Add Room” button to assign / reserve a room for the guest. 2.Now add room screen will appear. 3.Enter the check-in date in the field “Check-in”. 4.Enter the number of nights the guest(s) will be staying at field “Nights”. 5.Enter the check-out date in the field “Check-out”. Difference of check-out and check-in date will be automatically populated at field “Nights”. 6.Enter the number of adults at field “Adults”. 7.Enter the number of child/children at field “Children”. 8.Press Alt+L to select the Rate Type at field “Rate Type”. E.g. Rack Rate/Season Rate/Package Rate, etc. 9.Press Alt+L to select the Room Type at field “Room Type”. 10.Remaining fields like Average Rate, Total Amount and Numbers of Room will be filled up automatically. 11.Click “Reserve” and then click on YES to confirm the reservation.
Note:
•While Rate Type Rack Rate is fixed and will be viewed 365 days in a year, the Season Rates are based on their date range(s) mentioned in the Season Master and the Package Rates are based on minimum number of stay as mentioned in Room Reservation Option. •During booking a room for the guest it will show the available room types along with rate details after comparing the data of total number of guests including children with maximum occupancy defined in each room type. If any time total number of guests falls beyond the maximum occupancy of all types of rooms then it will show blank in list and in that case you need to book two or more rooms for the divided number of guests. |
-C Check-in
|
Press ALT + C or click on “-C Check-in” button to perform check-in activity.
Note:
•Once the status is changed to Check-in you cannot cancel the booking; however, you can vacate the room any time by performing the early check out using button “^E Early Check Out”. •Check-in is not possible in a dirty room, though after changing the room status to clean, you can perform check-in. |
^O Check-out
|
Press CTRL + O or click on “^O Check-out” button to perform the checking out activity.
Once the Check Out option is selected a pop-up appears prompting for payment. On clicking "Yes" the Payment screen will appear. If the "No" option is selected then the amount outstanding gets posted into the Guest's Ledger.
Note:
•In the FusionPMS, whenever a guest is checked-out, a task is generated automatically by the system stating “Check-out: Clean Room”, Room Status as “Dirty”, Task Status as “New” and Assigned to “[None]”, so that as soon as the check-out process happens the ground staff would be able to know instantly which room is vacant and dirty and needs to be cleaned up soon before next check-in of the guests. •By any manner the system will not allow to check-in into a dirty room. In that case you have to change the room status to clean from the House Keeping and only then after you can process for check-in. |
-I Gr Check -in
|
It marks all the rooms as Check- in in a single reservation voucher having the check-in date is as on today.
|
-J Gr Check-out
|
It marks all the rooms as Check- out in a single reservation voucher having the check-out date is as on today.
|
-K Un Check -In
|
If a room is marked as check-in by mistake, you can use uncheck-in to revert back. It converts back a check-in room to reservation mode having check-in date is as on today. Un check-in functionality is available in status screen, room view as well as in booking Screen.
•Un Check-in functionality will work only on check-In date. •If data is already posted, then un check-in cannot be done •Any early check-in charges are removed during un Check-in. |
^G Group Billing
|
Use this if single bill for group booking is required.
|
-D Display
|
Click this button or press ALT + D to display all entries of Room Reservation.
|
-T Payment
|
Press ALT + T or click on “-T Payment” button to get the payment screen to receive any partial or full amount due from the guest/customer. You can also refund amount from here.
For more details please visit:
Payment
|
^V Void
|
Press CTRL + V or click this button to cancel a reservation. Any time before check-in you can void a reservation and in this case Cancellation Policy applied for the room will not be applicable.
Note:
Now you can “Void” whole group bookings or few of the group bookings in one go. In order to select whole group bookings together press CTRL + SHIFT + END keys, or to select few of the bookings click on the required reservations pressing CTRL key. Once required reservations selected use the “Void" button. Subsequently, there will be a pop-up to confirm whether the selected reservations is to be "Void".
|
^F11 Rate Detail
|
It will display the daily rate applied for a particular Reservation ID. This will help the operator to check and know calculation of Room charges.
Suppose, you made a reservation from 01-12-2012 to 04-12-12 , then this button will display the information like below;
Room Type : Deluxe Single | Rate Card : Seasonal
|
Reservation ID: 1.001/1
|
Date
|
Room Charge
|
Extra Person
|
Extra Bed
|
Tax
|
Add Ons
|
Total
|
01-12-2012
|
20000.00
|
5000.00
|
10000.00
|
7105.00
|
5000.00
|
47105.00
|
02-12-2012
|
20000.00
|
5000.00
|
10000.00
|
7105.00
|
2500.00
|
44605.00
|
03-12-2012
|
20000.00
|
5000.00
|
10000.00
|
7105.00
|
2500.00
|
44605.00
|
|
60000.00
|
15000.00
|
30000.00
|
21315.00
|
10000.00
|
136315.00
|
|
F9 Cust Info
|
It shows various particulars of the Guest / Customer (like Guest’s personal details, purchase history, club membership points, etc.) in the Guest information window, when you click at F9 Cust Info button or press F9 button key.
Related Faq:
Is there any option to check if a particular customer is allowed for credit sale or not?
Is it possible to view the customer's total transaction amount on sale screen?
|
^L Busi Source
|
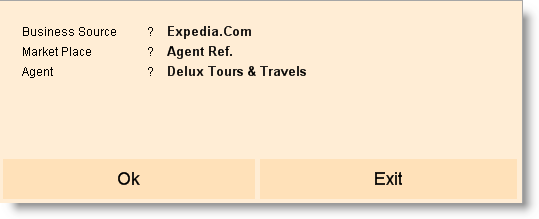
Press CTRL + L or click on “^L Busi Source” to select the source of the business. Business Source is simply a medium/mode through which the guest contacts you. A guest may get information about your hotel from the website, newspaper or any other type of advertisement.
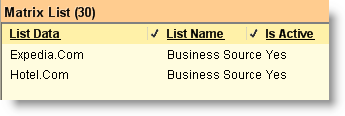
1.Press CTRL + N or from main menu go to the Matrix List (M > I > M) 2.Type the name of the Business Source like Expedia.com / Hotel.com etc 3.Press ALT + L at field “List Name” and then select “Business Source” from the list 4.Press ALT + S to save. 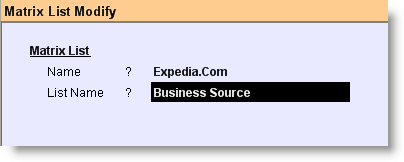
Display Business Source Master:
Tips:
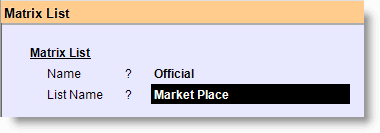
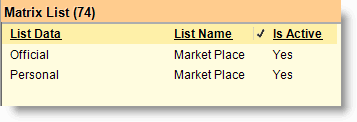
Similarly, you can create Market Place and in this case you have to choose Market Place at the field “List Name”. Market Place is simply purpose of visit of the guest like official or personal. Creation of a Market Place Master is very simple:
Market Place creation screen:
Market Place Display screen:
|
-P P Room Chgs
|
Post Room Charges. Press ALT + P or click on “-P P Room Chgs” to pass voucher entry for the Room Booking transactions. Generally posting of accounting entries for Room Booking transactions occurs as per the scheduled time of Night Audit; however, using this button you can enter those accounting entries immediately for the selected entry row. In this context you must note that it will always create accounting voucher for previous days transactions not for the transactions of today.
|
-L List
|
Click on “-L List” button or press ALT + L to get the list of respective master and select a master item.
|
-M Mod Booking
|
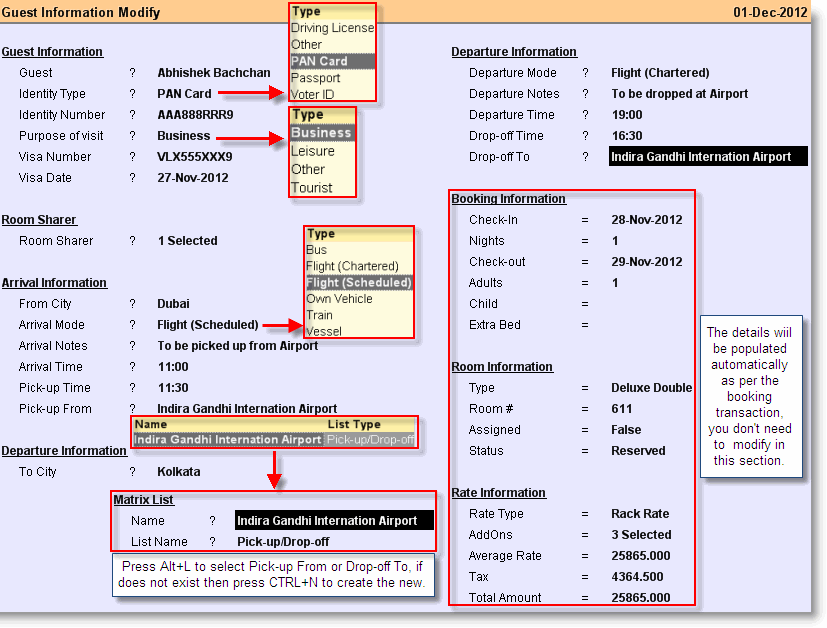
Press ALT + M or click on “-M Mod Booking” to enter Guest Information as shown in the picture below:
For more details please visit:
How to add room sharer(s) for an existing reservation?
|
^C Can Booking
|
Use to cancel the reservation before scheduled check-in date and this is subject to the penalty or cancellation fee as per the Cancellation Policy defined for the Room Type in the Rate Card Master. While cancelling the reservation a Cancellation Reason is mandatory to be selected. Cancellation Reason is nothing but the reason(s) for which a reservation is being canceled.
Note:
•Cancel Booking cannot be used on or after the scheduled check-in date. •Now you can “Cancel” whole group bookings or few of the group bookings in one go. In order to select whole group bookings together press CTRL + SHIFT + END keys, or to select few of the bookings click on the required reservations pressing CTRL key. Once required reservations selected use the “Cancel" button. Subsequently, there will be a pop-up to confirm whether the selected reservations is to be "Cancelled".
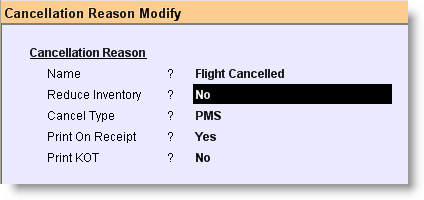
Creating a Cancellation Reason is very simple:
1.From main menu go to the Cancellation Reason (M > F > C) 2.Type the name of the Reason like Flight Cancelled at field “Name” 3.Set Reduce Inventory = No (Inventory will not be effected for cancellation) 4.Set Cancel Type = PMS 5.Set Print On Receipt = Yes (Cancellation Reason will be printed on Bill) 6.Set Print on KOT = No (Cancellation Reason will not be printed on KOT) 7.Press ALT + S to save.
Tips:
Similarly, you can create other Reasons like Personal Reason, Service Complaint etc.
|
-N No Show
|
This is basically used to cancel the reservation if guest does not reach the hotel for scheduled check-in and after crossing the schedule check-in time it seems that the guest will not come at all.
Where Cancel Booking is used before the scheduled check-in date, No Show can be performed any time on or after the scheduled check-in date & time. If a No Show Policy is defined for the Room Type in the Rate Card Master, then the No Show will be allowed only after Check-in Time + After Check-in Time (Hrs) set in the No Show Policy Master.
For example: If "Check-in Time = 11.30 AM" and "After Check-in Time (Hrs) = 2" then No Show can be done only on or after 01.30 PM.
No Show fee will be charged as per the No Show Policy is defined for the Room Type in the Rate Card Master.
Note:
•Now you can "No Show” whole group bookings or few of the group bookings in one go. In order to select whole group bookings together press CTRL + SHIFT + END keys, or to select few of the bookings click on the required reservations pressing CTRL key. Once required reservations selected use the "No show” button. Subsequently, there will be a pop-up to confirm whether the selected reservations is to be "No Show”. |
Exit
|
Click Exit button or press Esc button to come out of the current screen. A prompt appears if you attempt to exit before saving.
|
-U UDF
|
Click this button or press ALT + U to enter data for User Defined Fields.
For more details please visit:
How to add details like Transport No / Policy No in Sale Invoice (Scan POS)?
|
^M Move Room
|
Press CTRL + M or click this button to move the Guest to another room. Then list of the all Vacant and Reserved rooms will appear along with Room Type. It will not show already checked in rooms in list.
Select one of the available rooms in list to conclude the Move Room. Two types of Move Room can be performed here i.e. Normal Move and Room Swap.
If Room selected from the list is vacant then Normal Move room will work. Swap Room will work only if both the rooms (From and To) is reserved.
Room Swap will only be allowed with same room type. If it is tried between two different room types then following message will show say "Swap room can be possible in same room type".
Normal Move will be allowed with any room types and tariff amount will be updated as per the Upgrade charges during Move Room is set to Ask / Yes / No in the Room Booking Option.
After the swap, only Room Number will be changed where rest of the details will remain same with the respective Group Owner.
"From Room" length of stay should always be greater than or equal to "To Room". If "From Room" length of stay is smaller than "To Room" then following message will show say "Swap room not possible"
For more details please visit:
•What to do if don’t want to upgrade the tariff amount while moving a room? •How do I swap the rooms when reservation is full? |
^D Discount
|
Click this button or press CTRL + D to enter discount either in amount or in percentage, either for a selected room or for all of the rooms.
|
-O Opt Voucher
|
Click on “-O Opt Voucher” button or Press ALT + O to get the Room Reservation Option screen and set the options.
|
-W Opt Prn Win
|
Click on “-W Opt Prn Win” button or press ALT + W to get the Room Reservation Print Option and set the options.
|
-B Extra Bed
|
Press ALT + B or click on “-B Extra Bed” to serve the extra beds for the guests.
1.After clicking on this button Extra Bed screen will be appeared 2.Set date range from the date to the date extra bed is require at field “From Date” and “To date” 3.Set number of beds at “No. of Extra Bed” field 4.Click on OK then extra bed along with charges will be added to the guests account. |
-R Assign Room
|
Press ALT + R or click on “-R Assign Room” to assign a room before actual check-in.
|
-E Extend Stay
|
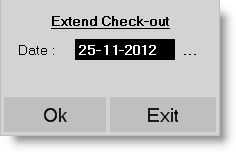
Press ALT + E or click on “-E Extend Stay” button to extend the date of check-out. If the guest wants to stay more than the scheduled date then you can extend his stay over the scheduled date using this button.
1.After clicking the button Extend Check-out screen will be appeared 2.Put the date till which the guest want to stay in the hotel 3.Click on OK then click on YES.
|
^E Early Check Out
|
Press CTRL + E or click on “^E Early Check Out” in order to perform the checking out before the scheduled Check-out date and time.Once the Early Check Out option is selected a pop-up appears prompting for payment. On clicking "Yes" the Payment screen will appear. If the "No" option is selected then the amount outstanding gets posted into the Guest's Ledger.
Note:
•In the FusionPMS whenever a guest is checked-out, a task is generated automatically by the system stating “Check-out: Clean Room”, Room Status as “Dirty”, Task Status as “New” and Assigned to “[None]”, so that as soon as the check-out process happens the ground staff would be able to know instantly which room is vacant and dirty and needs to be cleaned up soon before next check-in of the guests. •In any manner the system will not allow to check-in into a dirty room. In that case you have to change the room status to clean from the House Keeping and only then you can process the check-in. |
^P Print Inv
|
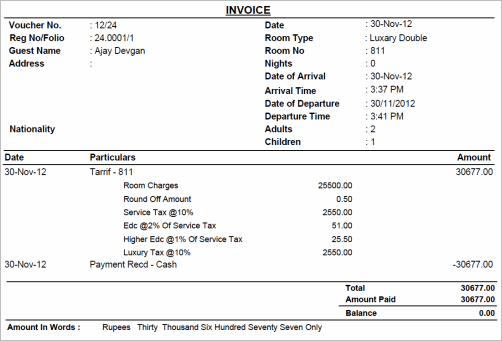
Use this button to print the bill / invoice of the selected transaction row.
|
^R Print Card
|
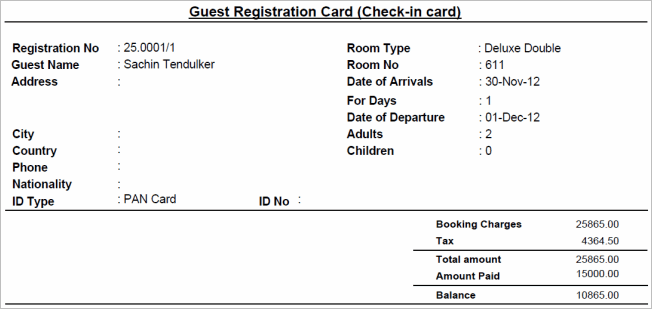
Use this button to print Check-in Card of the selected transaction row.
|
^B Print Conf
|
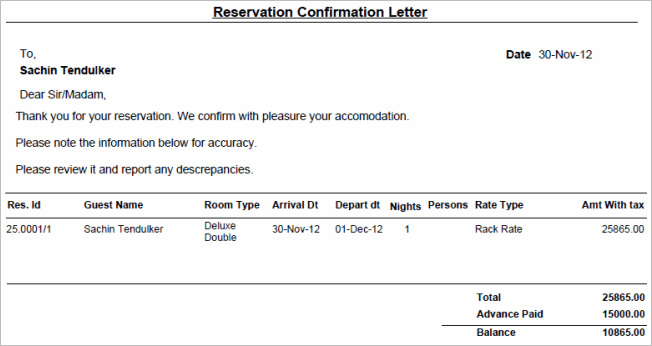
Use this button to print Booking Confirmation Letter of the selected transaction row.
|
^T Rate Card
|
Press CTRL + T or click this button to change the Rate Type of the selected Reservation.
Note:
•You can enter any date range but within the Reservation Period. •In the Rate Card list it will show the only Rate Type(s) available for the selected Reservation (Room Type). •It will change the Rate LW and Rate HW accordingly as per the Rate Type selected from the list. |
F12 Change Loc
|
Click on “F12 Change Loc” button or press F12 to change the location. The entire transaction will be moved to the selected Location.
|
-V Preview Dgn
|
Click on “-V Preview” button or press ALT + V to get the design screen to change the output format of the Reservation Document.
|
-F3 Report
|
Click this button or press ALT + F3 to view Reservation List.
|
-F11 Chg Voucher
|
Click this button or press ALT + F11 to select different Voucher Type for the transaction.
|
^S Split Bill
|
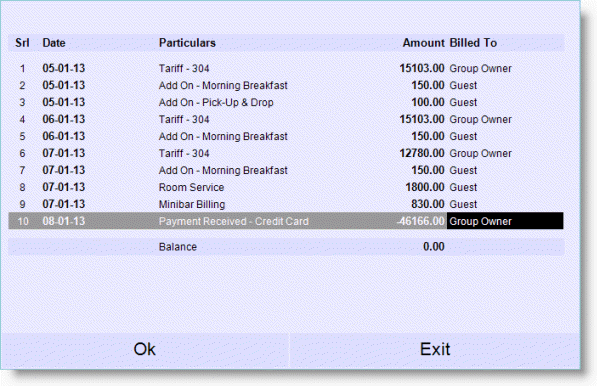
Press CTRL + S to segregate the expenditures among the Group Owner and Guest, so that invoice can be printed individually for the Group Owner and Guest(s) with segregated value as defined by the user. Accounting entry will also be posted accordingly.
Steps are given below:
1.Select a Guest entry row 2.Press CTRL + S or click button "^S Split Bill" 3.Date wise expenditures of the selected Guest will be displayed under the "Particulars" column along with Amount 4.Set either Group Owner or Guest for every expenditures at Billed To column 5.Press ALT + S to save 6.Now if you press CTRL + P to print the invoice for the selected Guest then it will print two invoices one for the Group Owner another for the Guest. 7.Where the expenditures are set to Group Owner will be printed in Group Owners invoice and the expenditures are set to Guest will be printed in Guests invoice.
|
-H Change Pax
|
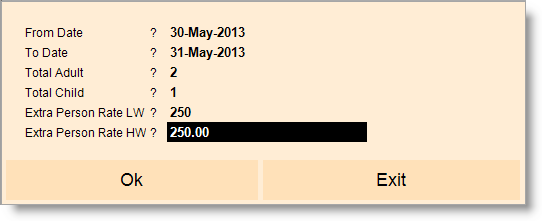
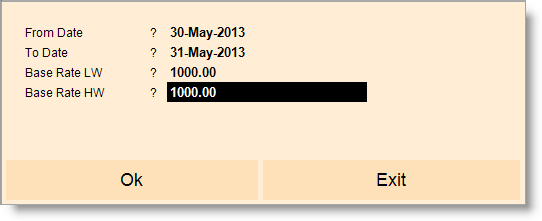
Press ALT + H to change Number of Pax, Extra Person Rate for High Week Days and Low Week Days for a given date range as shown in the picture below. Room Tarrif will be changed accordingly for that period, however the Night Audited data will remain unchanged.
|
-F Change Rate
|
Press ALT + F to change Room Rent for High Week Days and Low Week Days manually for a given date range. Room Tarrif will be changed accordingly for that period, however the Night Audited data will remain unchanged.
|
-G Group Owner
|
Press ALT + G to change Group Owner from the list then the charges will be posted to the selected Group Owners account, however the Night Audited data will remain unchanged.
|
^A Ch Add-on
|
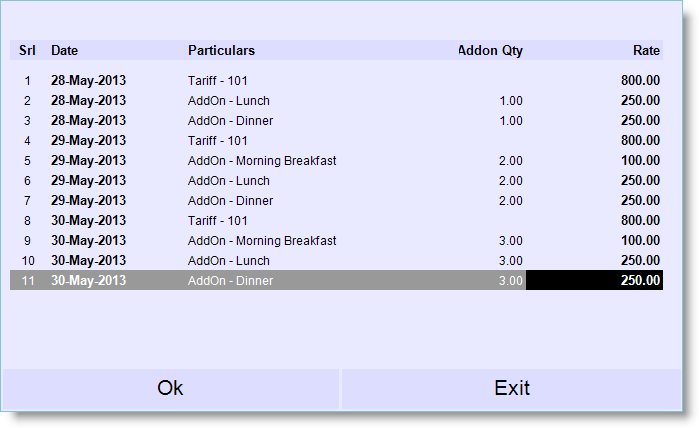
Press CTRL + A to add or remove add ons. Add-on charges will be changed accordingly, however the Night Audited data will remain unchanged.
Note:
•To add an Add-on press plus (+) button and then press ALT + L at "Particulars" column to get desired Add-on from the list. •To remove an selected Add-on row press ALT + Delete button. |
^U Under Stay
|
Click this button or press CTRL + U to bring forward the check-out to an earlier date. As we press this button it will ask for “Change Check out Date", this date should be less than the check-out date & greater than the check-in date and should be greater than or equal to the current date.
|
-Q Un Post Chg
|
Use this button to undo check-out, consequently Check-out will be converted into Check-in and all respective accouting entries will be removed accordingly.
|
F1 Help
|
Press F1 to get context sensitive help relating to the current voucher.
|
^Del Delete
|
Use this button to delete Reserved / Checked-in / Checked-out rooms. Consequently all respective accouting entries will be removed accordingly.
|
