Main Menu > Master Data Management > Inventory > Location Master
Location master is used to define the following things for a company
•Company's Name and Address
•Company's Tax Information
•Location of the Company (In case of Multi Location Setup)
•Link Setup and Information (In case of Multi Location Setup)
You can then define the data transfer rules between the location and transfer data accordingly between the locations.
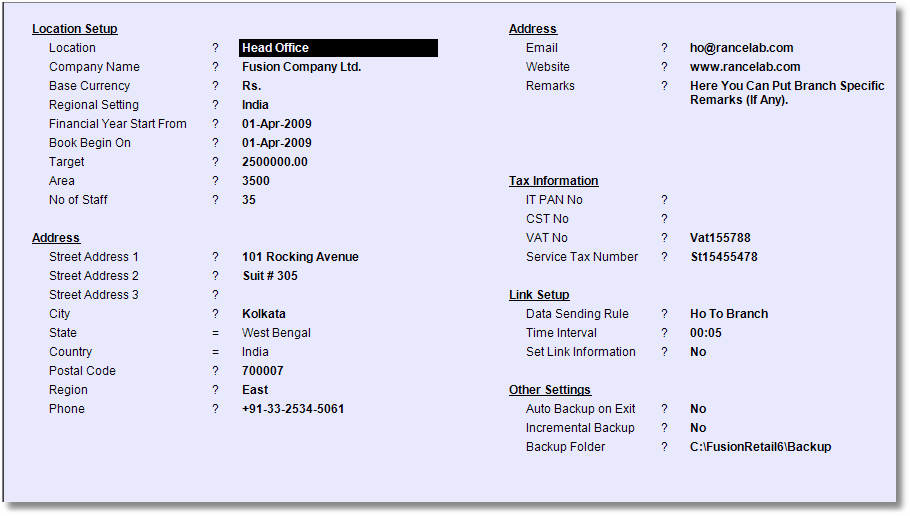
Think of Location Master as Company Master. •That is why, even if you are using RanceLab for only SINGLE location, you have to specify the company particulars through Location Master Entry. •If you are using RanceLab in single location then just modify the existing location (Head Office) |
Location Set Up |
|
Location |
Name of the Location as it will appear in the selection list. |
Company Name |
Name of the parent company. Each location is treated as a different company. Company name is used to print on reports and documents. |
Base Currency |
Select the Base currency from the list. Press Ctrl+N to create a new currency in the Currency Master. Base currency of different location of same Company may be different. |
Regional Setting |
Select the name of the country from the list. To create a new country record in the country master, press Ctr+N to get the country master entry screen to create a new country record. |
Financial Year Start From |
Enter the date of start of Financial Year of the Location. You cannot enter any voucher prior to this date. The F Y Closing date is computed as 1 year from this date. |
Book Begin on |
Enter the date from which you have started data entry in the system for the Financial Year. It must not be prior to ‘Financial Year Start From’ date. |
Target |
Set target for the location. |
Area |
Set area of the location. |
No of Staff |
Set number of staffs in the location. |
Work Plan |
Select a suitable Work Plan. Business hours for the Location will be based on selected Work Plan. Reservation (Spa) screen will not open if Work Plan is set to [None]. |
Team |
Press ALT + L to select a Team Master from the list. |
Address |
|
Street Address 1 Street Address 2 Street Address 3 |
Enter the Building / Door Number and name of street where office is located. Break up the complete address in 3 lines as you like to print in the envelope, mailing labels etc. |
City State Country |
Select the City from the list. Press Ctrl+N to enter a new city name. The State & Country is displayed form the record of City selected. |
Postal Code |
Enter the PIN (or ZIP) Code. |
Region |
Enter the region, if any, for your reference. There is no selection list here. |
Phone |
Enter the phone number of the location office. |
Website |
Enter the website address of the location office, if any. |
Remarks |
Enter any important note regarding the location for your internal memorandum only. |
Tax Information |
|
IT PAN # |
The Income Tax Permanent Account number of the location, if any Each location of same Company may have different IT PAN number. |
CST No |
The Central Sales Tax number & Registration date of the party, if any. Each location of a Company may have different CST number. |
VAT No |
The Value Added Tax number & Registration date of the party, if any. Each location may have different VAT number. |
Service Tax Number |
The Service Tax number of the party if any. Each location of a Company may have different Service Tax number. |
Link Set Up |
|
Data Sending Rule |
Enter the rule of data movement from the data sending option list, (e.g Branch to HO). Press Crl+N to add a new item in data sending rules master (i.e new rule) through Data Sending Rule screen. Set Yes to set up rule to transfer data within the same LAN. This is useful when more than one location is connected through LAN. |
Time Interval |
Set time interval for data sending and receiving. E.g. 00.05 means that system will start process of sending and receiving the data automatically after every 5 seconds. |
Set Link Information |
Set YES to set up options to transfer data through e-mail. This is useful when there are remote locations to which data cannot be transferred through LAN. So, you have to specify data transfer options through e-mail only. When you set Yes, You get Link Information screen to specify the options. Related Faq: Is it possible to bulk email all the sale bills to the selected email id(s) of my customer? |
Create Multi-Location Data |
Set Yes to create multi location data else set No. Yes = For maintaining Data in FTP mode. No = For maintaining Data in Offline mode. |
Other Settings |
|
Auto back up on exit |
Set Yes to automatically back up data after each session on log out. Set No, if no auto back is to be taken after log out. |
Incremental Back Up |
Set Yes to take only incremental back up (only new or altered records since last back up). Set No to take entire data backup at each back up session. For more detail please visit: Is it possible to create Incremental Backup in RanceLab FusionRetail™ 6? |
Back Up Folder |
Press ALT + L to get folder selection screen and select the folder where the backed up data would be stored. |
Activate Scheme & Promotion |
Set Yes to activate scheme & promotion for the location else set No. |
Property Information |
Set the property information. For more detail please visit: |
High Week Days |
1.Hit the Enter key to set High Week Days or Low Week Days for PMS transactions. 2.Choose days from the list which you want to keep as High Week Days like Saturday and Sunday. 3.Click OK then press Alt+S to save. 4.Remaining days from Monday to Friday will be treated as Low Week Days automatically. 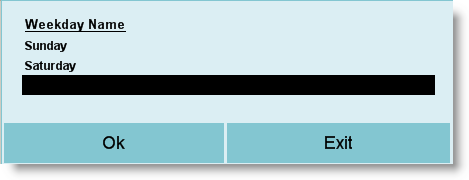 |
Early Check-in Policy |
Hit Enter key to set early check-in rules and charges as shown in the picture below: 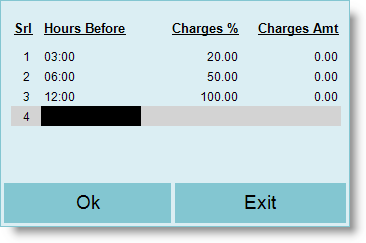 1.Check-in early on or before 02:59 hours will not be chargeable. 2.Check-in early any time between 03:00 to 05:59 hours will be charged 20% of the day Room Charges extra. 3.Check-in early any time between 06:00 to 11:59 hours will be charged 50% of the day Room Charges extra. 4.Check-in early on or before 12 hours will be charged full of the day Room Charges extra. |
Early Check-out Policy |
Hit Enter key to set early check-out rules and charges as shown in the picture below:  1.Check-out early before 04.00 hours will be charged as usual full Room Charges. 2.Check-out early any time between 04:00 to 07:59 hours will be charged 10% less (90% of the day Room Charges). 3.Check-out early any time between 08:00 to 11:59 hours will be charged 20% less (80% of the day Room Charges). 4.Check-out early on or after 12 hours will be charged 30% less (70% of the day Room Charges).
Example: If the Early Check-out policy is: •Check In Time: 12:00 am | Check Out Time: 12:00 pm •If the guest Checks out before 4:00 pm, There is no charges ("0%" charges) •If the guest Checks out between 04:00 pm to 6:00 pm, charges will be "50%" •If the guest Checks out after 6:00 pm, charges will be "100%" 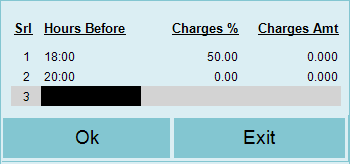
This shows that: •If the guest checks out before 20:00 Hrs. i.e between 12:00 pm to 04:00 pm then no charges will be applicable. •If the guest checks out between 20:00 to 18:00 Hrs. i.e between 04:00 PM to 06:00 PM then 50% charges will be applicable. •If the guest checks out after 18:00 Hrs. i.e after 06:00 pm then 100% charges will be applicable.
|
Late Check-out Policy |
Hit Enter key to set late check-out rules and charges as shown in the picture below:  1.Check-out late before 1 hours is not chargeable. 2.Check-out late any time between 01:00 to 03:59 hours will be charged 20% of the day Room Charges extra. 3.Check-out late any time between 04:00 to 07:59 hours will be charged 40% of the day Room Charges extra. 4.Check-out late on or after 8 hours will be charged full of the day Room Charges extra. |
Allow Day Open/Close Procedure |
Set Yes to allow Day Open and Day Close for the selected location else set No. |
Show Cost Price |
When this option is set to "No" then it will display cost price in all related reports as "0" or "1". This is just for the display purposes and hence will not affect database anywhere anyway. More, Purchase Rate and Purchase Value will not be shown in the transactions like Stock Transfer Indent, Stock Transfer, Stock Journal, Physical Stock, Rate Change etc. |
Default Time Interval for Reservation (Spa) |
It is used to set the default interval of the reservation module for SPA.  |
Buttons in the Location Master:
Most of the Buttons are similar to Account Ledger. Buttons specific to Location Master are discussed here.
-C Branch DB |
Click this button to create a new Database of Branch or Location from Server only, Attempt to create a new database from other client will give you a warning message. |
-B Branch DB 1 |
Click this button to create a new Database of Branch or Location exclude the transaction data. |
Multiple print exe by multiple instance of FR was causing print of duplicate bills in some cases.
Scenario:
FR used to start a print exe instance each time it get started. That means if you open FR 3 time then print exe will also start 3 times. This was causing duplicate print of bills in some extreme cases.
Solution:
We have restricted opening of print exe only one time even if multiple instance of FR is started.
We have done this by adding the following option in the Location Master ( M>I>L ),
Start Multiple Print Exe = NO / Yes
●If NO = it will check for the previously running instance of print exe and if previously running instance of Print exe's folder is same as current exe then it will not start a new instance.
●If YES = it will start a new instance of print exe without checking anything. You might need this option is you are using thin clients.
NOTE: THIS IS A BREAKING CHANGE FOR THE CUSTOMERS WHO ARE USING THE THIN CLIENTS OR USING MULTIPLE FOLDERS.
Voucher Date should be taken from Open Day Date instead of system date.
Scenario:
In case of Day Open / Close process, we take system date as voucher date after midnight. Due to this, it becomes challenging to tally sales or stock for the specific day whose duration falls between to calendar date.
Solution:
In Location Master, a new list type is added in the field of Allow Day Open /Close Procedure (apart from no / yes)
●No: in this case Day open / close process is not enabled
●Yes: Voucher Date = System Date
●Allow Day open/close Procedure: Without Midnight Date Change
○Voucher Date = Day Open Date instead of system date
○After midnight, Voucher Time should be always 11:59 PM till day close process.
○Other date and time fields (like date-time-in date-time-out in Sale Touch POS (STT) will be not affected by this.
It will work with every transaction such as
●Sale Scan POS ( S>T>S ) / Sale Touch POS ( S>T>T ) / Sale Challan / Sale Return
●Purchase / Purchase Challan / Purchase Return
●Stock Transfer / Indent
●Physical Stock Entry
●Accounting Voucher
Note: Auto Stock Journal Date is already based on the sale date.
Auto Stock Journal on Day Close
In Location Master (M>I>L) - Added an option
"Run Auto Stock Journal from Day Close = No/Yes"
On day close, it will run this process automatically.
Note: This process will run before the discrepancy adjustment from physical stock on day close. It will work only with sale data.
Automatic Update of Schedule Task on Date Change
Scenario: The task is created at 12.01 every day and take the last close day id.
But if the day close is after 12.01 then it skips the current day id (takes the last closed day id)
Solution: In Location Master We have added an option
●Auto Schedule Generation Time = 01:00
Implementation Example:
●If the server is on 24x7 and your approx day close time is 1 am
○AND you want to send auto emails at 2 am.
●Then set "Auto Schedule Generation Time = 01:30"
Guidelines to implement Indian GST in RanceLab
Enhancement in Masters for Indian GST Readiness
Location Master (MIL)
●A new field has been added under tax Information section “GSTIN No”
State Master
●A new field has been added in state master “State Code”
●It is two Digit Alphanumeric code as assigned by the Government.
●This field has been added in all related reports like Purchase Register, Sale Register
●And also in DOS & Windows bill printing
Added a new field Web Location Name in Location Master
It will be used in FusionMobi HD application to display location name.