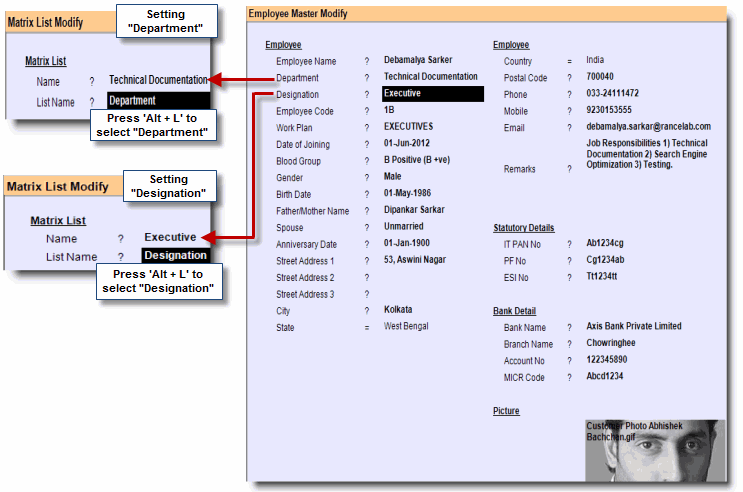
Employee
|
Employee Name
|
Enter the name of the employee.
|
Department
|
Select a “Department” by pressing ALT + L from the list. If there is no department in the list then press CTRL + N to create new department. You can create departments like Accounts, Marketing, Back Office, H.R., Admin, Technical Documentation etc. based on their job profile. While creating a department you must select “Department” in “List Name” field.
|
Designation
|
Select a “Designation” by pressing ALT + L from the list. If there is no designation in the list then press CTRL + N to create new designation. You can create designations like executive, manager, assistant manager etc. based on their job profile. While creating a department you must select “Designation” in “List Name” field.
|
Employee Code
|
Enter alphanumeric employee code.
|
Work Plan
|
Select a “Work Plan” from the list by pressing ALT + L. If there is no work plan in the list then please create it from “Work Plan”.
|
Date of Joining
|
Enter the Date of Joining.
|
Blood Group
|
Enter the Blood Group.
|
Gender
|
Enter the Gender.
|
Birth Date
|
Enter the Date of Birth.
|
Father/Mother Name
|
Enter the name of father or mother.
|
Spouse
|
Enter the name of spouse.
|
Anniversary Date
|
Enter the date of anniversary. If you don’t want to enter the anniversary date then just skip this field using ‘downward arrow key’ from keyboard or ‘mouse pointer’. Pressing ‘Enter’ in this field will take current system date automatically.
|
Street Address 1
|
Enter the Building / Door Number and name of street where resident is located. Break up the complete address in 3 lines as you like to print in the envelope, mailing labels etc.
|
Street Address 2
|
Street Address 3
|
City
|
Select the City from the list. Press CTRL + N to add a new City Name (and the corresponding State). The name of the State & Country is displayed.
|
State
|
Country
|
Postal Code
|
Enter the PIN (or ZIP) code of the Employee.
|
Phone
|
Enter the phone number of the Employee.
|
Mobile
|
Enter the mobile number of the Employee
|
Email
|
Enter the e-mail address of the Employee.
|
Remarks
|
Enter any special note for the Employee for reference.
|
Employee Type
|
Set Used in Spa Scheduling here. In the Reservation (Spa) screen it will show only those service staffs for whom Employee Type is set to Used in Spa Scheduling.
|
Skill
|
Select one or more Skills from the list. The Spa Activities defined in the Service Block can be performed only by the service staffs having the same Skill(s).
It will assist appointment making by automatically finding capable employee(s) for the relevant service(s) chosen.
|
Statutory Details
|
IT PAN No
|
Enter PAN number of the Employee.
|
PF No
|
Enter PF number of the Employee.
|
ESI No
|
Enter ESI number of the Employee.
|
Bank Details
|
Bank Name
|
Enter bank name of the Employee.
|
Branch Name
|
Enter branch name of the bank.
|
Account Name
|
Enter bank account number.
|
MICR Code
|
Enter MICR code of the bank.
|
Picture
|
Picture 1
|
You may Link up to two pictures of the employee (in the image formats, viz., gif and jpg).
|
Picture 2
|


