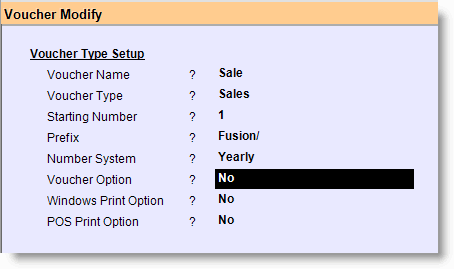
Main Menu > Master Data Management > Accounts > Voucher Type
RanceLab provides default voucher types for each type of transaction (e.g sale, purchase etc).
However, you may create multiple siblings of the basic Voucher types for security, accuracy & ease of operation (e.g Cash Sale, Credit Sale, etc. for SALE Voucher Type) and set the option accordingly.
For each voucher type, you may set its own numbering scheme, Transaction option and Printing option.

Voucher Type Name |
Enter the name of the voucher type |
Voucher Type |
Select the Basic Voucher Type from the list (e.g Sale) |
Starting Number |
Enter the starting voucher number of the voucher type |
Prefix |
Enter the prefix (any string of digits and letters,). This will be added at the beginning of the number. |
Number System |
Select the number initialization period (Yearly / Monthly / Daily). Accordingly, the number will start from 1 on change of period Voucher numbers will be constructed as follows: •Daily: Prefix / YYMMDD /Starting Number (e.g. POS/090304/1) •Monthly: Prefix / YYMM / Starting Number (e.g. POS/0903/1) •Yearly: Prefix / Starting Number (e.g. POS/5) |
Voucher Option |
Press "Y" or Alt + L to select Yes to open the Voucher (Transaction) Option. These options are used to change the functionality of default voucher screen. |
Windows Printing Option |
Press "Y" or Alt + L to select Yes to open the Windows Print Option screen. These options are used to change the functionality of default windows printing. |
POS Print Option |
Press "Y" or Alt + L to select Yes to open the POS Print Option screen. These options are used to change the functionality of default POS printing. |
Buttons in the Voucher Type:
Main Menu> Master Data Management> Accounts> Voucher Type

Voucher Type Display Screen:
Main Menu> Master Data Management> Accounts> Voucher Type > Display

Enhancement in Voucher Numbering
In Voucher Type(MAV), here added an option.
•Auto Prefix VchIDYMD = Yes/No.
If we select “Yes” then Auto Prefix date will show in all reports as per number System Selected, select “No” then do not Show auto prefix date.