Main Menu > Master > F&B > Table Setup
Here we define the layout of each section (area) of the restaurant. The layout created here is shown at the start of POS.
For example - If you have a restaurant spread across 3 different sections (floor) like Lounge Bar, Coffee Shop and Fine Dining. Then you might need to create 3 different layouts from here.
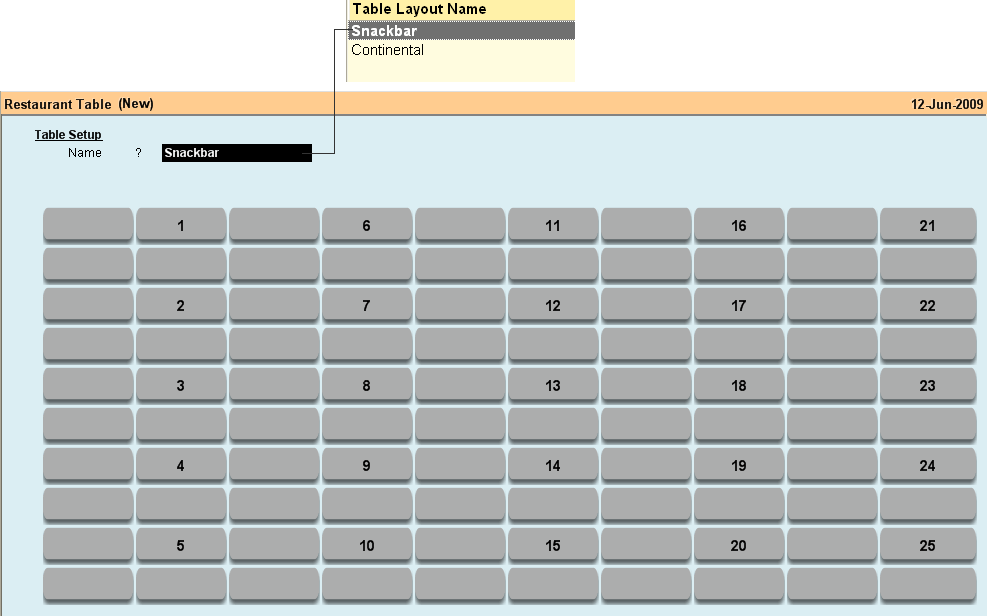
Through this entry screen you create a set of Tables and assign unique Table Numbers to each Table:
Table Setup |
Particulars |
Name |
Enter the name of Table Layout (e.g Snack Bar, Dining etc) |
Team |
Press ALT + L to select one or more Team Master(s) from the list. |
•Now specify the Table Name for each of the table. You will get a grid of 100 table layout. As per the table placement in the section, type a unique Table number. For example, to give Table number 1 to the first Table of the 2nd column (you do not like to use the first column as there are fewer Tables), click at the Table Tablet and type 1 to allocate Number 1 to the Table.
•In this way, you design the layout of Tables of every section (Table Master) for 100 Tables. The system will prevent allotting duplicate Table numbers. To delete a number of a Table, click on the table tablet and rove the number.
•The Table numbers must be unique considering the numbers in all Table Layout Masters. So, if you have several Table Layouts, then assign a serial number to all the Tables in the restaurant e.g 1 to 20 for Snack Bar, 21 to 40 for Dining etc., so that all Tables are allotted unique Table Numbers.
•Alternately, you may assign Serial Number for each set of Table Layout (e.g SB-1, SB-2, DN-1, DN-2 etc).

Buttons in the Table Setup:
Buttons in the Table Setup are as follows:

-D Display |
Click at "-D Display" button bar or press ALT + D for display of all the menus entries |
-L List |
Click at "-L List" button bar or press ALT + L to get the list of any item. |
Exit |
Click Exit button or press Esc button to come out of the current screen |
-S Save |
Click at "–S Save" Button or press ALT + S to save the entries |
F1 Help |
Click Help button to get context sensitive help |
Alias (other names) for Table Master used in Touch POS.
Scenario:
You may want to map a smart card with the table number. When you scan the smart card, it returns 10-15 digit. Keeping 10-15 digit number as table name is not practical.Therefor alias is required for the table name.
Solution:
In Table Setup (M>F>T), a button is added : "Alias Setup ( Alt + A )".
It will open a screen with Layout | Table Name | Alias
You need to scan the cards one by one on the alias column.
Now save the screen and the table name is now mapped with an alias.
Note: If a duplicate alias is found then it will not allow saving the screen.
Now in STT, in table mode, when you use open table command,
it will search first for the table name and if not found then it will check alias name.
If the alias is found then it will select the corresponding table number.