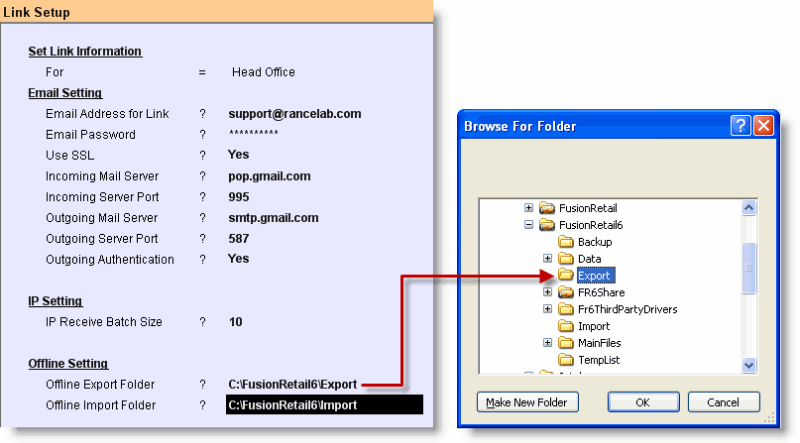
When you set Yes at Set Link Information field in the Location Master Entry screen, you get the following screen to specify the Link Information Options

Set Link Information |
|
For |
Enter the name of Link Information (e.g Link from HO to Mum). |
Email Setting |
|
Email Address for Link |
Enter the e- mail address (e.g rancelabho@gmail.com). |
Email Password |
Enter the e-mail Password . This info is not shown in screen for secrecy and is masked with a series of asterisks like ***************. RanceLab will verify the password at the time of login. |
Use SSL |
Set Yes / No as the case may be. |
Incoming Mail Server |
Enter the incoming mail server name (e.g.pop.gmail.com). |
Incoming Server Port |
Enter the incoming mail server Port (e.g 995). |
Outgoing Mail Server |
Enter the outgoing mail server Port (e.g smtp.gmail.com). |
Outgoing Server Port |
Enter the outgoing mail server Port (e.g 587). |
Outgoing Authentication |
Yes / No. |
IP Setting |
|
IP Receive Batch Size |
10 is default. HO will send 10 records from outbox at a time to the branch. You can increase or decrease this value. |
Offline Setting: Enter the name of the folder where data temporarily gets stored until transferred in a batch to the main database (e.g //admin:/d/) |
|
Offline Export Folder |
Enter the name of Offline Data Export Folder (e.g C:\FusionRetail6\Export). |
Offline Import Folder |
Enter the name of Offline Data Import Folder C:\FusionRetail6\Import. |
Need location specific menu in call center module.
Scenario:
You might have the different price of the same item at a different location in call centre module. Or you might have an entirely different menu for other location.
Solution:
In Location Master (MIL) > Link Info > Change the caption "Web Menu" to "Web / Call Centre Menu"
In call centre module, after customer selection, based on location of customer as per the street name and locality, the menu defined above will be activated.
Note: In Call Centre Sale voucher option, all the menu defined in location master, should be selected in menu setup.