RanceLab Multi Location brings you the enterprise wide connectivity across all of your location. It’s easy to setup procedure makes synchronization happens smoothly.
No harassment, no fancy hardware or high speed connectivity is required. You just need simple dial up or a broadband internet connection. No need to have fixed IP or leased lines.
All the locations will work independently, even if the internet connectivity is lost. During connectivity loss, data will be stored in local database. Once the internet connectivity is restored, the data will synchronize automatically based on the rules specified.
There is ONE Root Location and MULTIPLE Branch Location. You can choose from IM, FTP, Email, IP and Offline mode for data sending and receiving.
Root Location
Root Location : This is the location where you have installedRanceLab for the first time.
After installation you can create desired number of locations. After you save a location it will ask you if you need to Branch Snapshot (Backup) for that particular location. If you choose yes it will create a backup file with the “location name + date”.bak format.
This is basically a backup file to be sent to the branch location. You need to install RanceLab at branch and then restore the backup file from the HO and you are done.
Branch Location
Branch Location: Branch location gets all its masters and setting from the Root Location. All you have to do is to install the RanceLab and then restore the backup from the Root Location. After that you can do all the transaction locally and the data will sync to the Root Location.
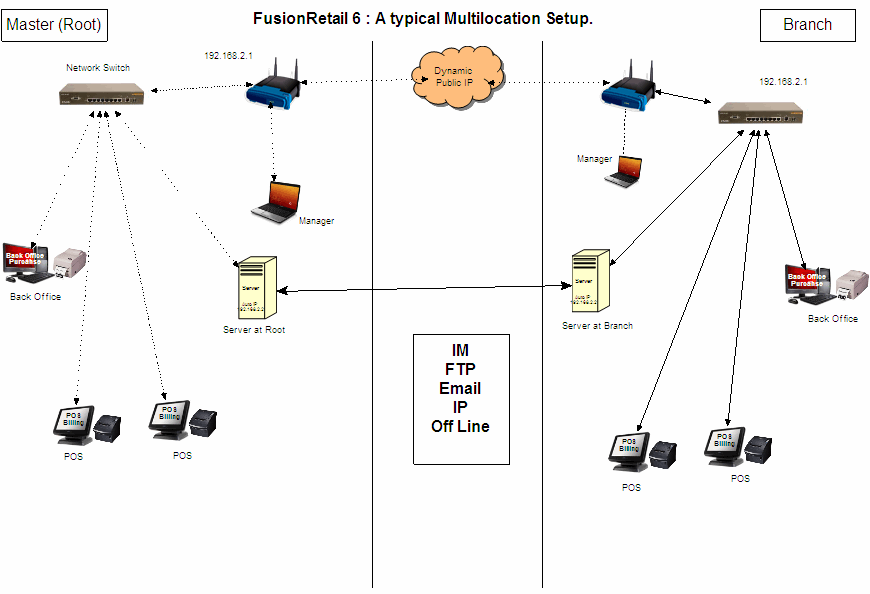
Let’s understand below diagram as typical Multi Location setup.
Master (Root) and Branch Locations are located at two different places. Both locations have their own local server and clients (back office, point of sale). These two locations communicate between each other using Instant Messaging (IM).
Root Location creates all master data files and using IM it sends it to Branch. As a routine work practice, branch is doing its day-to-day transaction entries. Once a transaction is made, it is stored in local database as well as it is sent to “Send Data Queue”. From there, it travels to Root Location.

Example: If we make a Sale entry at client location, it is saved locally and sent to “Send Data Queue”. In case internet connectivity is lost, data will be in queue. The moment connectivity is restored, data will be sent to server location and vice versa. This process ensures zero data loss and robust data synchronization.
Working in Multi Location Environment
The following tables show where you can create , modify and delete data in multi location Environment

There are two types of data synchronization
1.Auto Synchronization
2.Forceful Synchronization (Data Sending Rule)
Auto Synchronization
•Master data will be sent to all the locations (irrespective of active or not)
•Child is a master data and it will be sent to all the location - even from branch (purchase, stock journal and opening stock).
•If the data FOR other location is being created – it will be sent to the FOR location (irrespective of all the rules)
•Data of other location can be modified and deleted based on the Global Option = “Allow modification at other location”.
•If the data at other location is being modified or deleted – it will be sent to the created location (irrespective of all the rules)
Forceful Synchronization (Data Sending Rule)
•You can define the location you want to sync the data with. This is transaction wise.
•Main > Master > Inventory >Location > Data Sending Rule > Alt Enter
Required Voucher No series should be Location-specific
Scenario:
During transaction If location is changed, the Voucher series, warehouse, etc. should be adjusted automatically as per the location.
Solution:
In Location Master (MIL) - added an option.
Set Voucher Type = No/Yes.
Yes, it will open the voucher option screen to select voucher types in the user master.
In Global Option (TAG) -added an option.
'select voucher option from’ =” Location/user”.
If you select the location, it will pick the voucher option, set in the location master.
Note:
●During any voucher entry, If the input screen is blank during any voucher entry, only we will allow the change of location.
●We will not allow the location to change location in modify mode.