Main Menu > Master Data Management > Inventory > Opening Stock
When you first start using RanceLab for accounting, you have to enter the Opening Stock (Quantity & Value) for each Stock Item, as on the date from where you first start using RanceLab, through Opening Stock Voucher.
The entries in Opening Stock Voucher has to be done only once, in the first financial year.
Header Fields are as follows:
Product :
|
Press Alt+L and select the Product name from the list.
|
|
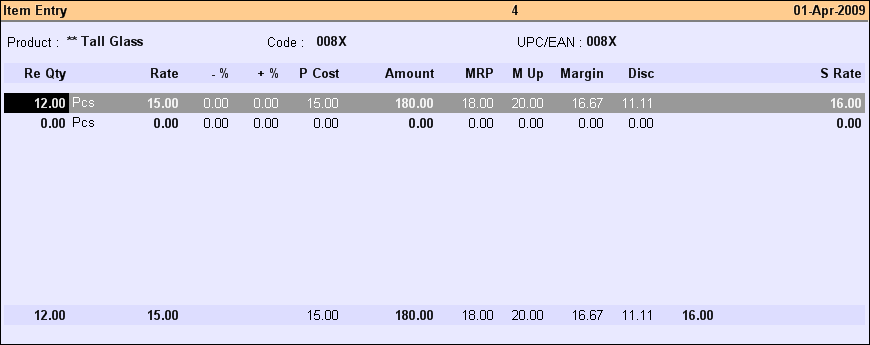
After you select the product from the list, you get the Item Entry Screen as shown below:
Item Entry Header:
Product
|
Product Name is displayed here.
|
Code
|
Corresponding Item Code is displayed from Product Master.
|
UPC/EAN
|
UPC/EAN No. is displayed from Product Master.
|
Item Line Details:
Re Qty
|
Enter the Opening Quantity.
|
Rate
|
Enter the Rate of Product as per last Accounts Statement.
|
-%
|
Enter Deduction, if any, in %.
|
+%
|
Enter additional charge, if any, in %.
|
P Cost
|
The Purchase Cost per unit is displayed.
|
Amount
|
Computed amount for the Quantity is displayed (P Cost * Quantity).
|
MRP
|
Enter the MRP (Sale price per unit).
|
M Up
|
Mark Up percent (Profit as per MRP over Purchase Cost in %, computed as [(MRP- P Cost/ P Cost] x 100 is displayed here.
|
Margin
|
Margin is computed and shown.
|
Discount
|
Enter the Discount % (manual discount) for the Product.
|
Sale Price
|
This is a Sale Price field. User may add Markup % to get this field value calculated or he may manually feed in the Sale Price per unit of item entered.
|
|
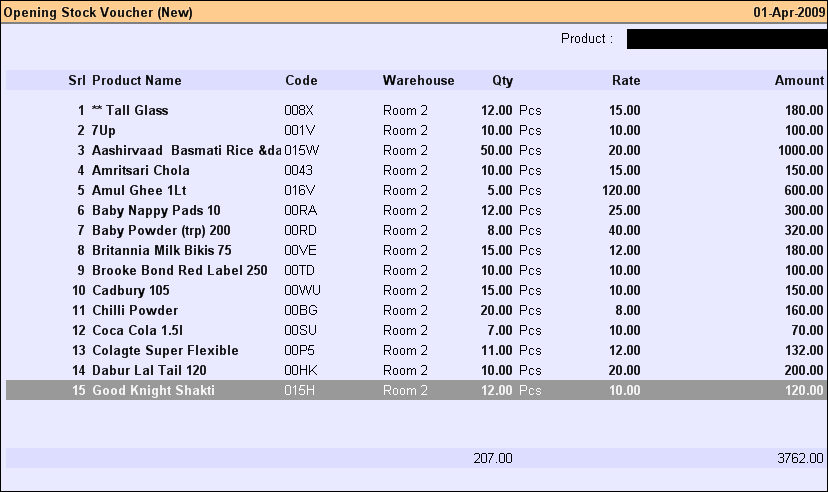
Line Item Fields are as follows:
Srl
|
Running Item serial number in the voucher displayed.
|
Product Name
|
Product Name of selected product.
|
Product Code
|
Corresponding Item Code is displayed from Product Master.
|
Warehouse
|
Select the Warehouse from the list (Press Alt+L) where the Stock is lying.
|
Qty
|
Qty of Stock as entered is displayed.
|
Rate
|
Rate display is carry on Item entry screen at MRP Field.
|
Amount
|
Amount is also calculated on (Qty. x Rate).
|
|
Buttons in the Opening Stock are as follows:

-D Display
|
Click this button or press Alt+D to display all the entries of Opening Stock Voucher.
|
^B Barcodce Prn
|
Click this button or press CTRL+B to print product barcode of selected items. For multiple selection use CTRL key or SHIFT + DOWN ARROW key.
|
-S Save
|
Click this button or press Alt+S to save any changes made.
|
-L List
|
Click this button or press Alt+L to get the list of respective masters and select a master item.
|
Exit
|
Click Exit button or press Esc button to come out of the current screen. A prompt appears if you attempt to exit before saving.
|
F1 Help
|
Press F1 to get context sensitive help related to the current voucher.
|
-O Opt Voucher
|
Click this button or Press Alt+O to get the Opening Stock Option screen and to set the options.
|
-W Opt Prn Win
|
Click this button or press Alt+W to get the Opening Stock Window Print Option screen to set the options.
|
-H Pr History
|
Click this button or press Alt+H to view the Product Child History Report of the selected item from the list.
|
^D Delete
|
Click this button or press Ctrl + D to delete the Voucher. To delete a specific item entry, press Alt+Delete on the Item entry line.
|
^P Print
|
Click this button or press Ctrl+P to print the Voucher.
|
F12 Change Loc
|
Click this button or press F12 to change the Location.
|
-B Barcode Dgn
|
Click this button or press Alt+B to select and redesign the Product Bar Code design file (Barcode Label Designer).
|
-V Preview Dgn
|
Click this button or press Alt+V to get the preview designer and redesign the print format of the Opening Stock Voucher.
|
-F3 Report
|
Click this button or press Alt+F3 to view Opening Stock Report.
|
-E List Editor
|
Click this button or press Alt+E to get the List Editor screen to change the list setting for the transaction.
|
-F11 Chg Voucher
|
Click this button or press Alt+F11 to select a different Voucher Type for the transaction.
|
-U UDF
|
Click this button or press Alt+U to enter data for User Defined Fields.
|
-N Container
|
Click this button or press Alt+N to select Container from the list.
For more detail please visit:
How to use Container Management System in FusionRetail6?
|
^F11 All Column
|
Click this button or press CTRL+F 11 to view item wise transaction details showing all deductions and additions to the item rate.
|
|


