Main Menu > Master Data Management > Accounts > Opening
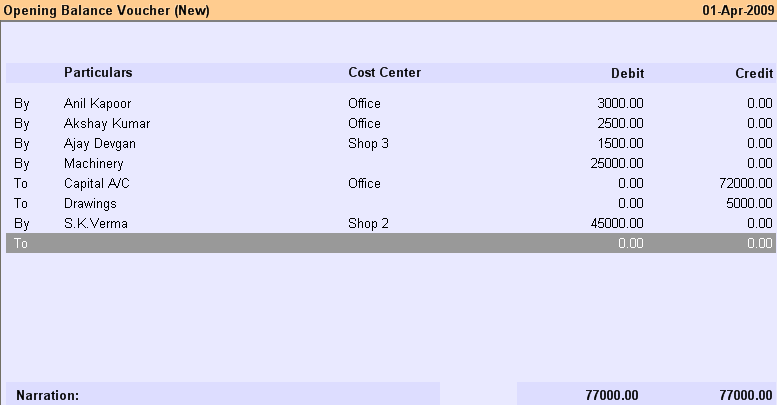
When you first start using RanceLab for accounting, you have to enter the Opening Balance for each ledger account, as on the date from where you first start using RanceLab, through Opening Balance Voucher.
The entries in Opening Balance Voucher has to be done only once, in the first financial year.
By / To
|
Select By to enter Debit Amount, select To enter Credit Amount
|
Particulars
|
Press ALT + L and select the Ledger Account for which the Opening Balance is being entered
|
Cost Center
|
Press ALT + L and select the Cost Center for which the Opening Balance is being entered. Select None if no Cost Center is applicable
|
Debit
|
Enter the Debit Amount (if you have selected By)
|
Credit
|
Enter the Credit Amount (if you have selected To)
|
Narration
|
Enter particulars about Opening Balance, if any. The narration entered will appear in the ledger account
|
If there is Opening Balance in respect of multiple Cost Center for same ledger, separate records are to be entered for each Cost Center.
Bill Reference entry screen of Opening Balance : After entry of Cost Center details, you get a screen to enter Bill Reference details of Opening Balance in the same way as Bill Reference entry of Accounts Voucher (Payment / Receipt)
Buttons in the Opening Balance are as follows:
-D Display
|
Click this button or press ALT + D to display all the entries of Opening Stock Voucher.
|
-S Save
|
Use this button to save any changes made.
|
-L List
|
Click this button or press ALT + L to get the list of respective masters and select a master item.
|
Exit
|
Click Exit button or press Esc button to come out of the current screen. A prompt appears if you attempt to exit before saving.
|
F1 Help
|
Press F1 to get context sensitive help related to the current voucher.
|
-O Opt Voucher
|
Click this button or Press ALT + O to get the Opening Balance Option screen and to set the options.
|
-W Opt Prn Win
|
Click this button or press ALT + W to get the Opening Balance Window Print Option screen to set the options.
|
^D Delete
|
Click this button or press CTRL + D to delete the Voucher(s). To delete a specific item entry, press ALT + Delete on the Item entry line.
|
^P Print
|
Click this button or press CTRL + P to print the Voucher.
|
F12 Change Loc
|
Click this button or press F12 to change the Location.
|
-V Preview Dgn
|
Click this button or press ALT + V to get preview designer and redesign the print format of the Opening Balance Voucher.
|
-F3 Report
|
Click this button or press ALT + F3 to view the Opening Stock Report.
|
-E List Editor
|
Click this button or press ALT + E to get the List Editor screen to change the list setting for the transactions.
|
-F11 Chg Voucher
|
Click this button or press ALT + F11 to select different Voucher Types for the transaction(s).
|
-U UDF
|
Click this button or press ALT + U to enter data for User Defined Fields.
For more details please visit:
How to add details like Transport No / Policy No in Sale Invoice (Scan POS)?
|
|


